- Buy DVD Online!
- Batto-Do Championships Registration
- Black Belt Rank
- Katana Video Trailers
- Martial Arts Instructor
- Samurai Sword History
- Batto-Do/Kendo/Iaido History
- Katana & Japanese Swords
- Tatami/Goza Mats Target
- Japanese Sword Cleaning
- Sword Safety Lesson
- Free Guided Meditation
- Join Facebook Martial Arts


Katana Anatomy: Every Part Has a Name and a Job
A Japanese sword is not one object but a collection of parts, and each part has its own name, its own purpose and its own vocabulary. Students who learn those terms early find that everything else gets easier, because an instructor can simply say “keep the shinogi turned toward the opponent” and the correction lands immediately instead of needing a demonstration. What follows traces the blade from tip to tang, then covers the fittings that hold it, and finally sorts out the different kinds of Japanese swords you will meet in a dojo or a collection.
Blade: Kissaki, Yokote, Mune, Shinogi and Hamon
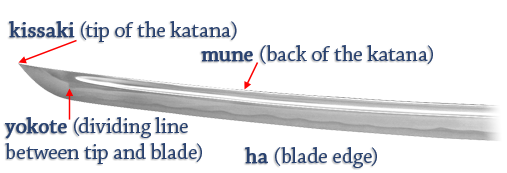
Kissaki — the tip of the blade. Its size and geometry decide how the sword behaves in the final centimetres of a cut. A long, sweeping kissaki carries more momentum and forgives a slightly shallow angle; a short, compact one is easier to control in confined spaces. The continuation of the temper line into the point is called the boshi, and polishers judge the health of a blade by it, because a worn or chipped boshi can mean the tip has been reshaped.
Yokote — the line separating the kissaki from the main body of the blade. On many older swords it is a polished line rather than a physical ridge, and on a badly polished blade it disappears entirely. That matters when you are buying: the presence and crispness of the yokote tells you how much material has been removed over the sword’s life.
Ha and mune — the cutting edge and the spine. The mune is never sharpened; it is where a blade takes its stiffness and where the smith leaves the profile that resists bending. Several mune shapes exist (maru, ihori and shinogi being the common ones), and each changes the weight and the feel of the sword in the hand.
Shinogi — the ridge line running the length of the blade that divides the flat shinogi-ji from the bevel above the edge. Where that ridge sits defines the cross-section of the sword, and different schools and periods favour different proportions. Practically, the shinogi is also the easiest place to spot a bend or a bad repair, which is why experienced buyers sight along it in a bright room before looking at anything else.
Hamon — the temper line, the visible boundary between the hard edge and the softer, tougher body of the blade. It is created during heat treatment when the smith coats the blade in clay, leaving a thin layer near the edge so that only that section hardens. The bright crystalline dots called nie and the misty band called nioi are not decoration; they are evidence of how the steel was treated, and they cannot be faked by polishing.
Nagasa — the length of the blade, measured from the notch at the base of the edge to the point of the kissaki. Japanese smiths work in shaku and bu rather than centimetres, and this one measurement does most of the work when it comes to classifying a sword.
Fittings: Habaki, Tsuba, Tsuka, Saya and Kojiri
Habaki — the collar fitted at the base of the blade. It seats the sword in the scabbard, keeps it from rattling, and takes the shock of the draw. A loose habaki is one of the most common faults in a used sword and one of the cheapest to correct.
Tsuba — the guard. It stops the hand from sliding forward onto the edge and shields the fingers if an opponent’s blade slides down your own. Tsuba are also art objects in their own right, and many carry the signature of the craftsman who made them. Thin washers called seppa sit on either side and keep the assembly tight.
Tsuka — the handle, built around the tang and wrapped in ray skin beneath a cord or silk binding. The whole handle is held to the sword by a single peg called the mekugi, traditionally bamboo. That peg is deliberately the weakest link: it can be tapped out for cleaning, and it will fail before the blade or the handle does. Check it before every practice and replace it the moment it looks crushed.
Nakago — the tang, unpolished and usually signed by the smith on one side and dated on the other. The dark patina on a tang is left untouched on purpose; a tang that has been scrubbed bright is a warning sign that someone has tried to hide something.
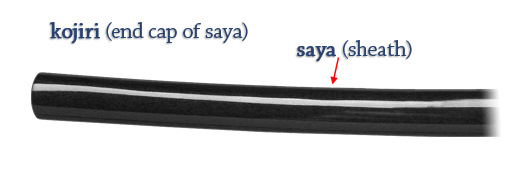
Saya — the scabbard. Its mouth is the koiguchi, the small knob for the carrying cord is the kurikata, and the fitted cap at the far end is the kojiri. The kojiri is more than a finish: it protects the end of the scabbard from splitting when the saya is set down or bumped, and a missing kojiri eventually means a cracked saya and a scratched blade.
Types of Japanese Swords: Katana, Wakizashi, Tanto and Tachi
Katana — the long sword, generally two shaku or more in length, worn edge upward thrust through the belt. It is the sword most people picture when they hear the word, and it is the one taught in the majority of modern sword schools.
Wakizashi — the companion sword, shorter than the katana and worn indoors as well as on the road. A katana and a wakizashi worn together form the daisho, the matched pair that marked a samurai’s status. The wakizashi is quick to draw in a confined space, which is precisely why it existed.
Tanto — the dagger, under one shaku in length. Do not confuse the classical tanto with the mass-market blades sold under the same name today; the historical weapon was a serious close-quarters arm with its own mounting styles and its own techniques.
Tachi — the older, longer sword worn edge down, suspended from the belt by cords. Tachi generally predate the katana, carry a deeper curve, and are mounted very differently, with the fittings designed to be read from the outside. Many of the finest surviving blades are tachi.
You will also meet the terms gunto for military-issue swords of the nineteenth and twentieth centuries, and gendaito or shinsakuto for blades made in modern times by trained smiths. All of them share the anatomy described above; what changes is the era, the mounting and the quality of the work.
Iaito and Shinken: Which Blade Should You Train With?
An iaito is a practice sword with an unsharpened blade, usually made from a zinc-aluminium alloy rather than steel. It cannot cut, it will not rust the way a steel blade does, and it is balanced to be safe for the repetitive drawing and sheathing that iai demands. Almost every student should begin here.
A shinken is a live blade, whether it is an antique family sword or a modern hand-made piece. It cuts, and it will cut you or the person beside you without hesitation if the fundamentals are not already in place. A shinken belongs in solo practice and cutting tests, never in paired drills, and it should never be carried by someone who has not yet learned to sheath an iaito smoothly a thousand times over.
The usual progression is a wooden bokken for form and basics, then an iaito for drawing and sheathing, then a shinken once the habits are reliable. Anyone who reverses that order is building on sand. Buying a live blade first is the most common and most expensive mistake new students make.
How the Parts Work Together
Knowing the vocabulary is not academic. The pegs and washers are the reason a sword can be taken apart and inspected; the habaki is the reason it sits correctly in the saya; the shinogi is the reason you can tell a sound blade from a tired one; the hamon is the reason you can tell how the steel was made. A student who understands these things takes better care of equipment, buys more wisely, and practises more safely.
Our DVD series treats this anatomy as the foundation of everything that follows, and the discs walk through inspection, maintenance and handling before a single technique is taught. Take a look at our notes on Japanese sword cleaning and the sword safety lesson for the practical side of living with a blade, and browse Katana & Japanese swords for more on choosing one. If you would like to study with us in person, our rank and certification page explains how the programme is structured, and you are always welcome to contact us with questions.